Getting started
Start a new Web Application Project, add Liquid.jar to the project's library
You can also download a sample project :
In the
.jsp page you are working (maybe index.jsp), under the
head section, add required file (that is inside Liquid.jar) by the following code :
Please note : in order to get file inside a
.jar file you need
servlet3 (Apache Tomcat 7.0.x, jboss 5.2)
    <head>
    <!-- Start Liquid Engine -->
    <%@ include file="/liquid/liquidHeader.jsp" %>
    <%@ include file="/liquid/liquidSelector.jsp" %>
    <%@ include file="/liquid/liquidAssets.jsp" %>
    </head>
In the body section add required container of the entities you neeed ... for example :
    <body>
    <div id="topNavigationBar" style="width:100%; height:30px; border:1px solid lightgray"></div>
    <div id="WinXContainer" class="liquidWinXContainer" style="width:100%; height:calc(100% - 74px); border:1px solid lightgray"></div>
    <div id="bottomNavigationBar" style="width:100%; height:40px; border:1px solid lightgray"></div>
    </body>
Then get the .json file from server and create the menu (javascript and jsp code) :
    <script>
        $( document ).ready(function() {
            Liquid.startMenuX(document.getElementById('menuXTop'), '<%=workspace.get_file_content(request, "/myMenuX.json")%>');
        });
    </script>
Please note you should execute the code after dom is loaded (body.onload event), but if the document is not yet ready Liquid automatically scheduled the object's creation
Code's comment:
Liquid.startMenuX : javascript function to create the menu
'menuXTop' : is the HTMElement id of the menuX container
'<%=workspace.get_file_content(request, "/myMenuX.json")%>' : the function to get the .json file from the server and pass it as a string
Load and show a generic control (.json file)
    <head>
        <%
            out.println( workspace.get_table_control(request, "controlId", "<Relative Path To JSON File to load>", true) );
        %>
    </head>
Please note " is the path of the json file to load relative to web root folder (where home page file is located)
You may also need to load all .json files inside a folder :
    <script>
        <%
            out.print(workspace.get_table_controls_in_folder(request, "/My JSON controls folder", false));
        %>
    </script>
Show navigation bars :
    <script>
        Liquid.startNavigatorsBar("topNavigationBar");
        Liquid.startNavigatorsBar("bottomNavigationBar");
    </script>
Database connection
Define connection by adding (multiple) connection source addLiquidDBConnection in the com.liquid.connection :
addLiquidDBConnection should be called before incluse liquid files (it should be the first call) :
connection are handled by "database" keyword
    <%
        com.liquid.connection.addLiquidDBConnection( "driver", "host", "port", "database", "user", "password");
    %>
    ...
    ...
    <head>
    <!-- Start Liquid Engine -->
    <%@ include file="/liquid/liquidHeader.jsp" %>
    <%@ include file="/liquid/liquidSelector.jsp" %>
    <%@ include file="/liquid/liquidAssets.jsp" %>
    ...
    ...
supported drivers are : "oracle", "postgres", "sqlserver", "mysql", "mariadb"
Another way, expecially if you want to use connection pool, is to define the connection by the class connection in the package app.liquid.dbx :
package app.liquid.dbx;

import java.net.InetAddress;
import java.sql.Connection;
import java.sql.DriverManager;
import java.util.logging.Level;
import java.util.logging.Logger;

/**
 *
 * @author ...
 */
public class connection {

    //
    // Connection with default database
    //
    static public Connection getDBConnection() throws Throwable {
        Connection conn = ...
        return conn;
    }

    //
    // Connection to defined database
    //
    static public Connection getDBConnection(String database) throws Throwable {
        if(database != null && !database.isEmpty()) {
            Connection conn = ...
            return conn;
        } else {
            return getDBConnection();
        }
    }

    static public String getConnectionDesc() {
        return "[ *** Connetion description *** ]";
    }

    // This is an optional method .. if you need a callback to release your owns
    static public boolean closeDbConnection(Connection conn) {
    	try {
            MyConnectionFactory.releaseConnection(conn);
    	} catch(Throwable th) {
    	}
        return true;
    }
}
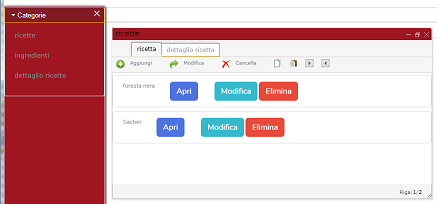
A sample
Liquid is running right now...
A sample page with a
menuX (on the left), two
navigation bar (on the upper and lower area), and some
winX (show its by click in the menu):
How do you define a menuX :
Liquid entities are configured by
.json in the server
{
 "name":"leftMenu"
,"tooltip":"left menu demo"
,"type":"left"
,"width":"200px"
,"height":"100%"
,"resize":true
,"caption":"Liquid Left Menu"
,"accordions": [
    {
         "name":"Main"
        ,"height":250
        ,"sections":[
            { "name":"Database"
                ,"commands":[
                    { "name":"Select DB", "server":"com.liquid.event.testEvent", "params":[], "client":"LiquidEditing.onSetDatabase()" }
                ]
            }
            ,{ "name":"Schema"
                ,"commands":[
                     { "name":"Select Schema", "server":"", "params":[], "client":"LiquidEditing.onSetSchema()" }
                ]
            }
            ,{ "name":"Window"
                ,"commands":[
                     { "name":"New window", "server":"com.liquid.event.testEvent", "params":[], "client":"Liquid.onNewLiquid()" }
                ]
            }
        ]
    }
]
,"commandsOrder":"after"
,"commands":[
     { "name":"winX normal", "server":"com.liquid.event.testEvent", "params":[], "client":"Liquid.startWinX('testWinX.3', winXJson, 'WinXContainer', '')" }
    ,{ "name":"winX maximized", "server":"com.liquid.event.testEvent", "params":[], "client":"Liquid.startWinX('testWinX.1', winXJson, 'WinXContainer', 'maximized')" }
    ,{ "name":"winX minimized", "server":"com.liquid.event.testEvent", "params":[], "client":"Liquid.startWinX('testWinX.2', winXJson, 'WinXContainer', 'iconic')" }
]
}
Project mode and security considerations :
A client cannot access to server's data until the server-side code has not validated it
If You want to create new window, or modify existing one, you must enable project mode in server-side
To do this, in the .jsp page, under javascript section, after included "liquid.js" :
<%@page import="com.liquid.workspace"%>
<head>
    <script>
        // Enable Project Mode
        glLiquidGenesisToken = '<%= workspace.enableProjectMode() %>';
    </script>
</head>
You may also set a working folder to save your .json files" :
<script>

    // get access token
    String GenesisToken = workspace.enableProjectMode(request);

    // Set json files working folder (relative to web root folder)
    workspace.set_project_folder(request, "LiquidJSONs", GenesisToken);

</script>
A typical approach in your jsp page :
(don't put follows code inside tag <script>; java code automatically print it)
<head>
    <%
        // get access token
        String GenesisToken = workspace.enableProjectMode(out);

        // Set json file working folder (absolute, inside the project's source files)
        workspace.set_project_folder(request, "/home/[USER NAME]/[PROHECT NAME]/web/iquidJSONs", GenesisToken);

        // Load all .json file in folder
        out.print(workspace.get_table_controls_in_folder(request, "iquidJSONs", false));
    %>
</head>
Creating custom command :
In order to define a custom command you should make two action :
Define it in the json file of your control
write server side callback
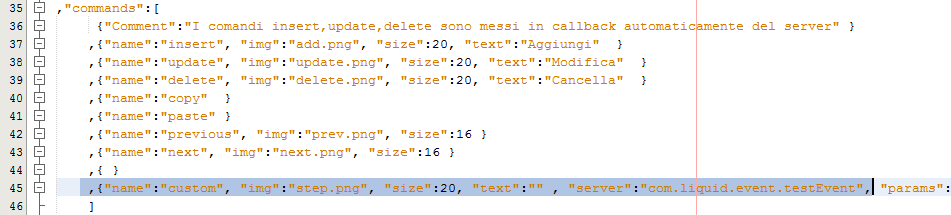
A sample json (only the commands area)
...

,"commands":[
     {"Comment":"The comands insert,update,delete are prepared automatically by the server" }
    ,{"name":"insert", "img":"add.png", "size":20, "text":"Aggiungi"  }
    ,{"name":"update", "img":"update.png", "size":20, "text":"Modifica"  }
    ,{"name":"delete", "img":"delete.png", "size":20, "text":"Cancella"  }
    ,{"name":"copy"  }
    ,{"name":"paste" }
    ,{"name":"previous", "img":"prev.png", "size":16 }
    ,{"name":"next", "img":"next.png", "size":16 }
    ,{ }
    ,{"name":"custom", "img":"step.png", "size":20, "text":"" , "server":"com.liquid.event.testEvent", "params":["test1", "test2"], "client":"clientSideCallbackTest" }
    ]

...
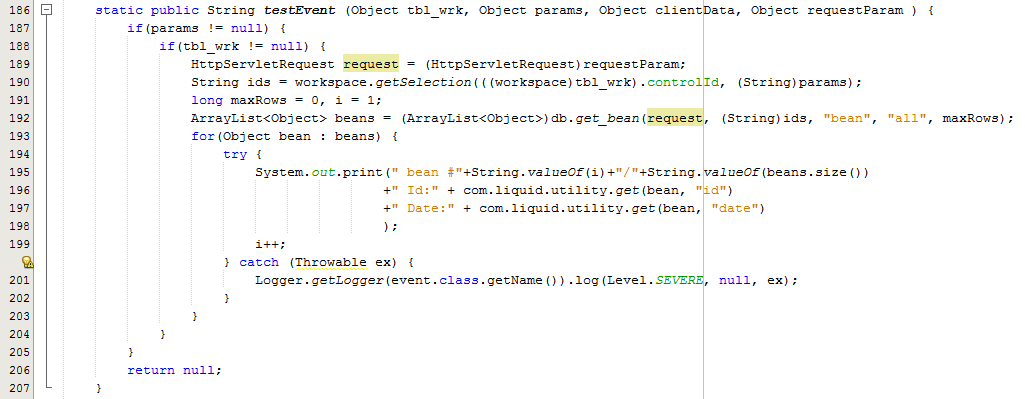
A sample java callback
    static public String testEvent (Object tbl_wrk, Object params, Object clientData, Object requestParam ) {
        if(params != null) {
            if(tbl_wrk != null) {
                HttpServletRequest request = (HttpServletRequest)requestParam;
                String ids = workspace.getSelection(((workspace)tbl_wrk).controlId, (String)params);
                long maxRows = 0, i = 1;
                ArrayList<Object> beans = (ArrayList<Object>)db.get_bean(request, (String)ids, "bean", "all", maxRows);
                for(Object bean : beans) {
                    try {
                        System.out.print(" bean #"+String.valueOf(i)+"/"+String.valueOf(beans.size())
                                        +" Id:" + com.liquid.utility.get(bean, "id")
                                        +" Date:" + com.liquid.utility.get(bean, "date")
                                        );
                        i++;
                    } catch (Throwable ex) {
                        Logger.getLogger(event.class.getName()).log(Level.SEVERE, null, ex);
                    }
                }
            }
        }
        return null;
    }
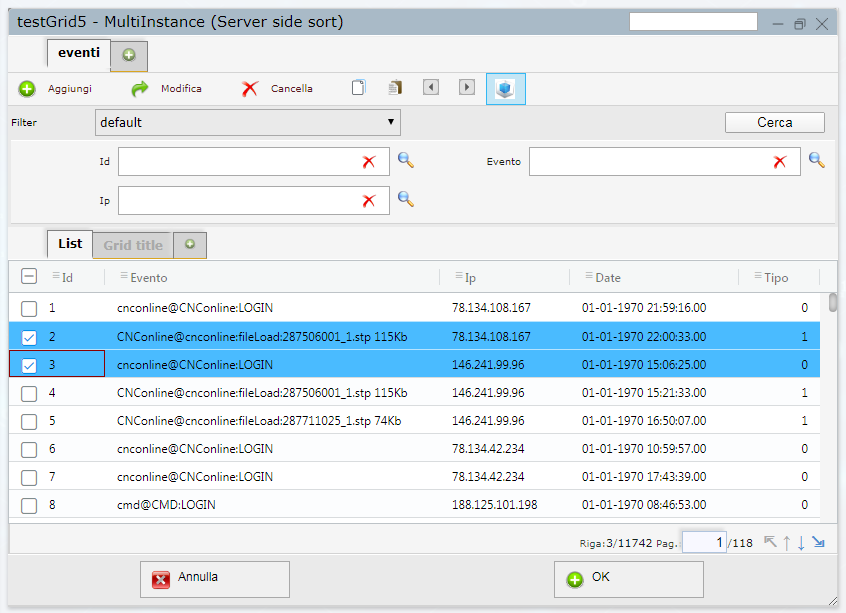
How to test it :
In your ide apply a break-point in the server side callback (by the sample : com.liquid.event.testEvent)
In your browser go to the web page owning the control
Select one or more rows
Liquid pass to the callback the list of the primary keys of selected rows (In the params object of testEvent)
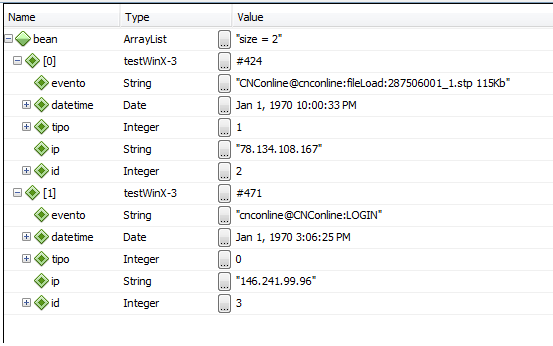
By calling
db.get_bean(...) Liquid automatically create an ArrayList of beans filling it with the data
In order to manipulate data you can read the bean by calling
utility.get(...) (or by java reflection)
automatically refresh the rows changed in web page by passing append to the result string the db.update(...) output
A sample server side code :
static public String myCallback (Object tbl_wrk, Object params, Object clientData, Object requestParam ) {
    if(params != null) {
        if(tbl_wrk != null) {
            HttpServletRequest request = (HttpServletRequest)requestParam;
            String ids = workspace.getSelection(((workspace)tbl_wrk).controlId, (String)params);

            String result = "{", updateResults = "{";
            ArrayList<Object> beans = (ArrayList<Object>)db.get_bean(request, (String)ids, "bean", "all", maxRows);
            if(beans != null) {
                int i=1, n = beans.size();
                for(Object bean : beans) {
                    try {
                        result += " bean #"+String.valueOf(i)+"/"+String.valueOf(n)
                                + " Id:" + utility.get(bean, "id")
                                + " Date:" + utility.get(bean, "datetime")
                                + " col #1:" + utility.get(bean, workspace.getColumn(tbl_wrk, 0).getString("name"))
                                + " col #2:" + utility.get(bean, workspace.getColumn(tbl_wrk, 1).getString("name"))
                                + " col #3:" + utility.get(bean, workspace.getColumn(tbl_wrk, 2).getString("name"))
                                + " col #4:" + utility.get(bean, workspace.getColumn(tbl_wrk, 3).getString("name"))
                                ;
                        i++;

                        int tipo = (int)utility.get(bean, "tipo");
                        utility.set(bean, "tipo", tipo+1);

                    } catch (Throwable ex) {
                        Logger.getLogger(event.class.getName()).log(Level.SEVERE, null, ex);
                    }


                    // Updating DB
                    String updateResult = db.update ( bean, tbl_wrk );
                    updateResults += (updateResults.length()>0?",":"") + updateResult;
                }
            }
            result += "\"";
            result += ",\"details\":["+updateResults+"]";
            result += "}";
        }
    }
    return null;
}
N.B: every update could change one or more rows in one or more tables, and you can do multiple calls to db.update
Just collect the db.update result and put it in and array as 'details' item
Liquid recognize the 'details' field in the response and automatically read all changed rows
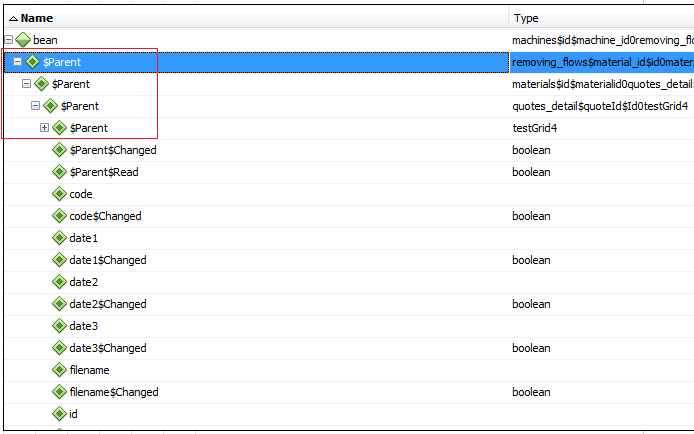
Reading parent beans :
A sample of server side callback code (java) :
static public String myCallback (Object tbl_wrk, Object params, Object clientData, Object requestParam ) {
    String result = "{ \"result\":1";
    String updateResults = "";

    result += ",\"message\":\"testParentBean(): ";

    if(tbl_wrk != null) {
        if(params != null) {
            String ids = db.getSelection(tbl_wrk, params);
            long maxRows = 0;
            ArrayList<Object> beans = (ArrayList<Object>)db.get_bean(requestParam, (String)ids, "bean", "all", "all", maxRows);
            if(beans != null) {
                int i = 1, n = beans.size();
                for(Object bean : beans) {
                    Object parentLevel1Bean = db.load_parent_bean( bean, params, maxRows );
                    Object parentLevel2Bean = db.load_parent_bean( parentLevel1Bean, params, maxRows );
                    Object parentLevel3Bean = db.load_parent_bean( parentLevel2Bean, params, maxRows );

                    result += " bean #"+String.valueOf(i++)+"/"+String.valueOf(n)
                            + " Id:" + utility.get(bean, "id")
                            + " Level 1 parent bean :" + parentLevel1Bean
                            + " Level 2 parent bean :" + parentLevel2Bean
                            + " Level 3 parent bean :" + parentLevel3Bean
                            ;
                }
            }
        }
    }
    result += "}";
    return result;
}
Using Inserting Row event to add your own data:
By handling
onInserting event Liquid execute the server code you define in the json
A sample of server side onInserting event code (java) :
 ,"events":[
             { "name":"onRowRendering" ,"server":"" ,"client":"onFeedbacksMessageRowRender" }
            ,{ "name":"onInserting" ,"server":"app.liquidx.event.onInsertingMessage" ,"client":"" }
        ]
A sample of server side code (java) :
    static public Object onInsertingMessage (Object tbl_wrk, Object params, Object clientData, Object requestParam ) throws JSONException {
        if(tbl_wrk != null) {
            if(params != null) {
                // Get data (row data) as JSONObject
                JSONObject rowData = com.liquid.event.getJSONObject(params, "data");
                if(rowData != null) {
                    // Set current logged userID
                    rowData.put("3", com.liquid.login.getLoggedID((HttpServletRequest) requestParam));
                    // Set current feedbackID
                    rowData.put("2", ((HttpServletRequest)requestParam).getSession().getAttribute("feedbackID"));
                    if(rowData.length()>0) {
                        return (Object)"{ resultSet:["+rowData.toString()+"], \"client\":\"\" }";
                    }
                }
            }
        }
        return (Object)null;
    }
Using Liquid commands
You may want to build your custom layout for Insert,Update,Delete,Filter (CRUD operations)
Here you could find some sample :
Inserting new row :
<img src="/images/add.png" style="cursor:pointer;" onclick="Liquid.command('controlId', 'insert')"/>
Replace 'controlId' with the name of the control, and that's it
The Liquid's native commands are :
insert, modify, delete, copy, paste, next, previous, filter
Setting and executing filters :
    <script>
        Liquid.setFilter(controlId, columnName, filterValue, filterOperator);
    </script>

    <img src="/images/filter.png" style="cursor:pointer;" onclick="Liquid.executeFilter('controlId')"/>
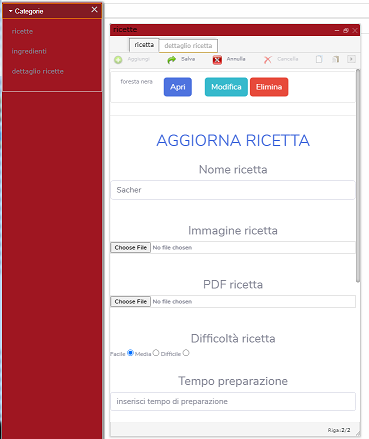
Customizing layout
In Liquid you can define your own layouts for view, insert, and update operations :
1) create your .jsp or .html pages
2) create a new layout
3) in the layout property, define the source for the operations (source, sourceForInsert, sourceForUpdate)
Here is sample of .json file:
    {
        "database":"..."
        ,"schema":"..."
        ,"table":"..."
        ,"columns":[
            ...
        ]
        ...
        ,"layouts":[
            {    "name":"name of layout"
                ,"title":"title show in the tab"
                ,"tooltip":"the tooltip"
                ,"icon":""
                ,"source":"url(/relative path of layout jsp/php/html page)"
                ,"sourceForInsert":"url(/relative path of layout, for inserting, jsp/php/html page)"
                ,"nRows":-1
                ,"overflow":"auto"
                ,"rowPadding":10
                ,"tabVisible":true
            }
        ]
    }
some samples of customizing layout :
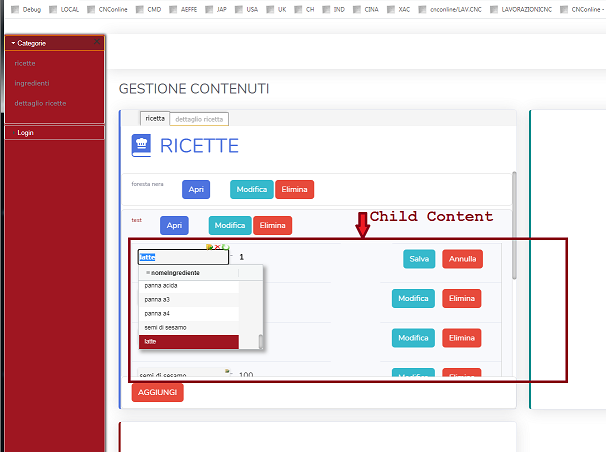
You could also use grids to define your owns; defining a background image, and re-positioning the edit items :
Using Liquid built-in direct commands
    // insert a row
    Liquid.command(controlId, 'insert')

    // deleting a row by primary key
    Liquid.command(controlId, 'delete', primaryKey)

    // updating a row by primary key
    Liquid.command(controlId, 'update', primaryKey)

    // coping a row into clipboard
    Liquid.command(controlId, 'copy', primaryKey)

    // paste a row from clipboard
    Liquid.command(controlId, 'paste', primaryKey)
Using Liquid gui native commands
    // insert a row
    Liquid.insertRow(controlId, 'insert')

    // deleting a row by primary key
    Liquid.deleteRow(controlId, primaryKeyValue, bSenstivaCase)

    // updating a row by primary key
    Liquid.updateRow(controlId, primaryKeyValue, bSenstivaCase)

    // cancelling current command
    Liquid.rollback()

    // select a row
    Liquid.selectRow(controlId, primaryKeyValue, bSenstivaCase)

    // setting a field value (in current row)
    Liquid.setField(controlId, field, value)

    // getting a field value (in current row)
    Liquid.setField(controlId, field)

 Access to billion of records by
  Add fields from
  Access to several
  Manage server-side and client-side
  Define
  Configure the
  Create customized and multiple level
  Create
  Create a
  Create easily a
  Create a
  Build custom commands and manipulate
  Display in the client
  Execute
  Event
Event  Clipboard for
  Execute
  Use
Use